

Back up and recover services
Protect your data with automatic backups and point-in-time recovery
Tiger Cloud provides comprehensive backup and recovery solutions to protect your data, including automatic daily backups and point-in-time recovery.
Automatic backups
Section titled “Automatic backups”Tiger Cloud automatically handles backup for your Tiger Cloud services using the pgBackRest tool. You don’t need to perform
backups manually.
Tiger Cloud automatically creates one full backup every week, and incremental backups every day in the same region as your service. Additionally, all Write-Ahead Log (WAL) files are retained back to the oldest full backup. This means that you always have a full backup available for the current and previous week:
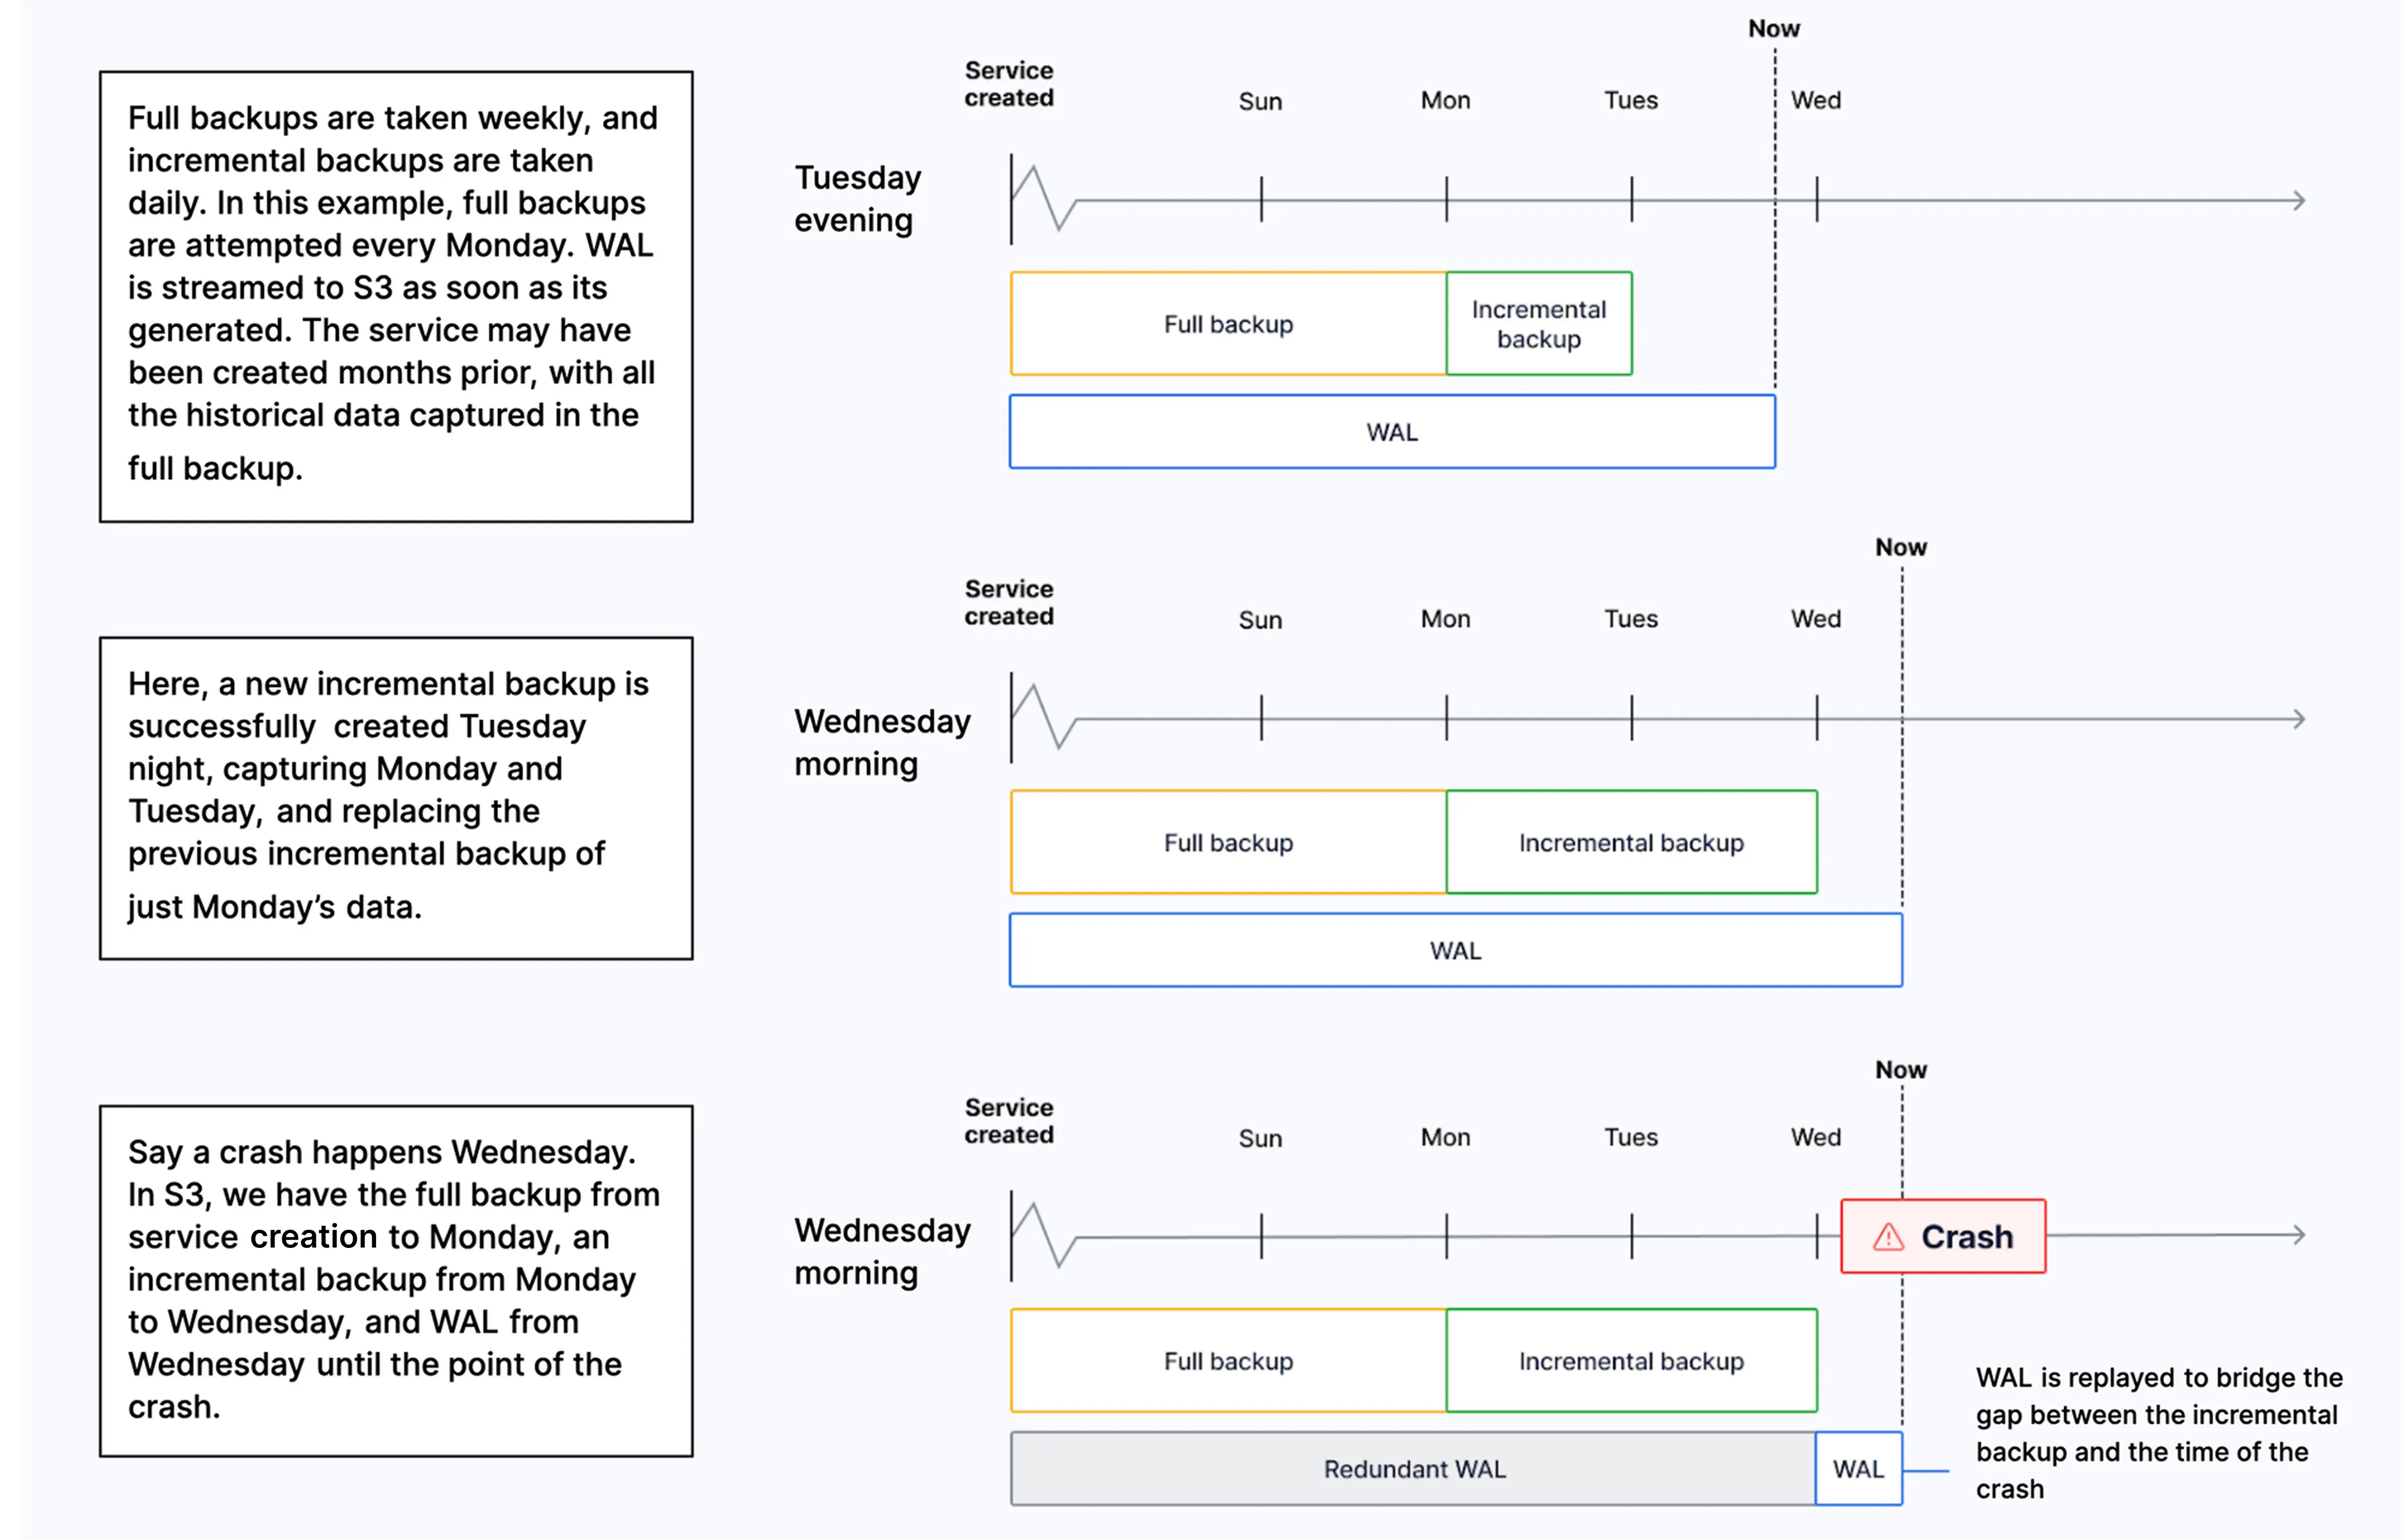
On Scale and Performance pricing plans, you can check the list of backups for the previous 14 days in Tiger Console. To do so, select your service, then click Operations > Backup and restore > Backup history.
In the event of a storage failure, a service automatically recovers from a backup to the point of failure. If the whole availability zone goes down, your Tiger Cloud services are recovered in a different zone. In the event of a user error, you can create a point-in-time recovery fork.
Create a point-in-time recovery fork
Section titled “Create a point-in-time recovery fork”To recover your service from a destructive or unwanted action, create a point-in-time recovery fork. You can recover a service to any point within the period defined by your pricing plan. The original service stays untouched to avoid losing data created since the time of recovery.
Since the point-in-time recovery is done in a fork, to migrate your application to the point of recovery, change the connection strings in your application to use the fork. The provision time for the recovery fork is typically less than twenty minutes, but can take longer depending on the amount of WAL to be replayed.
To avoid paying for compute for the recovery fork and the original service, pause the original to only pay storage costs.
You initiate a point-in-time recovery in Tiger Console:
- Ensure the service is running or paused
In Tiger Console, from the
Serviceslist, ensure the service you want to recover has a status ofRunningorPaused. - Create a recovery fork
Navigate to
Operations>Backup & restoreand clickCreate recovery fork. - Select the recovery point
Select the recovery point, ensuring the correct time zone (UTC offset).
- Configure the fork
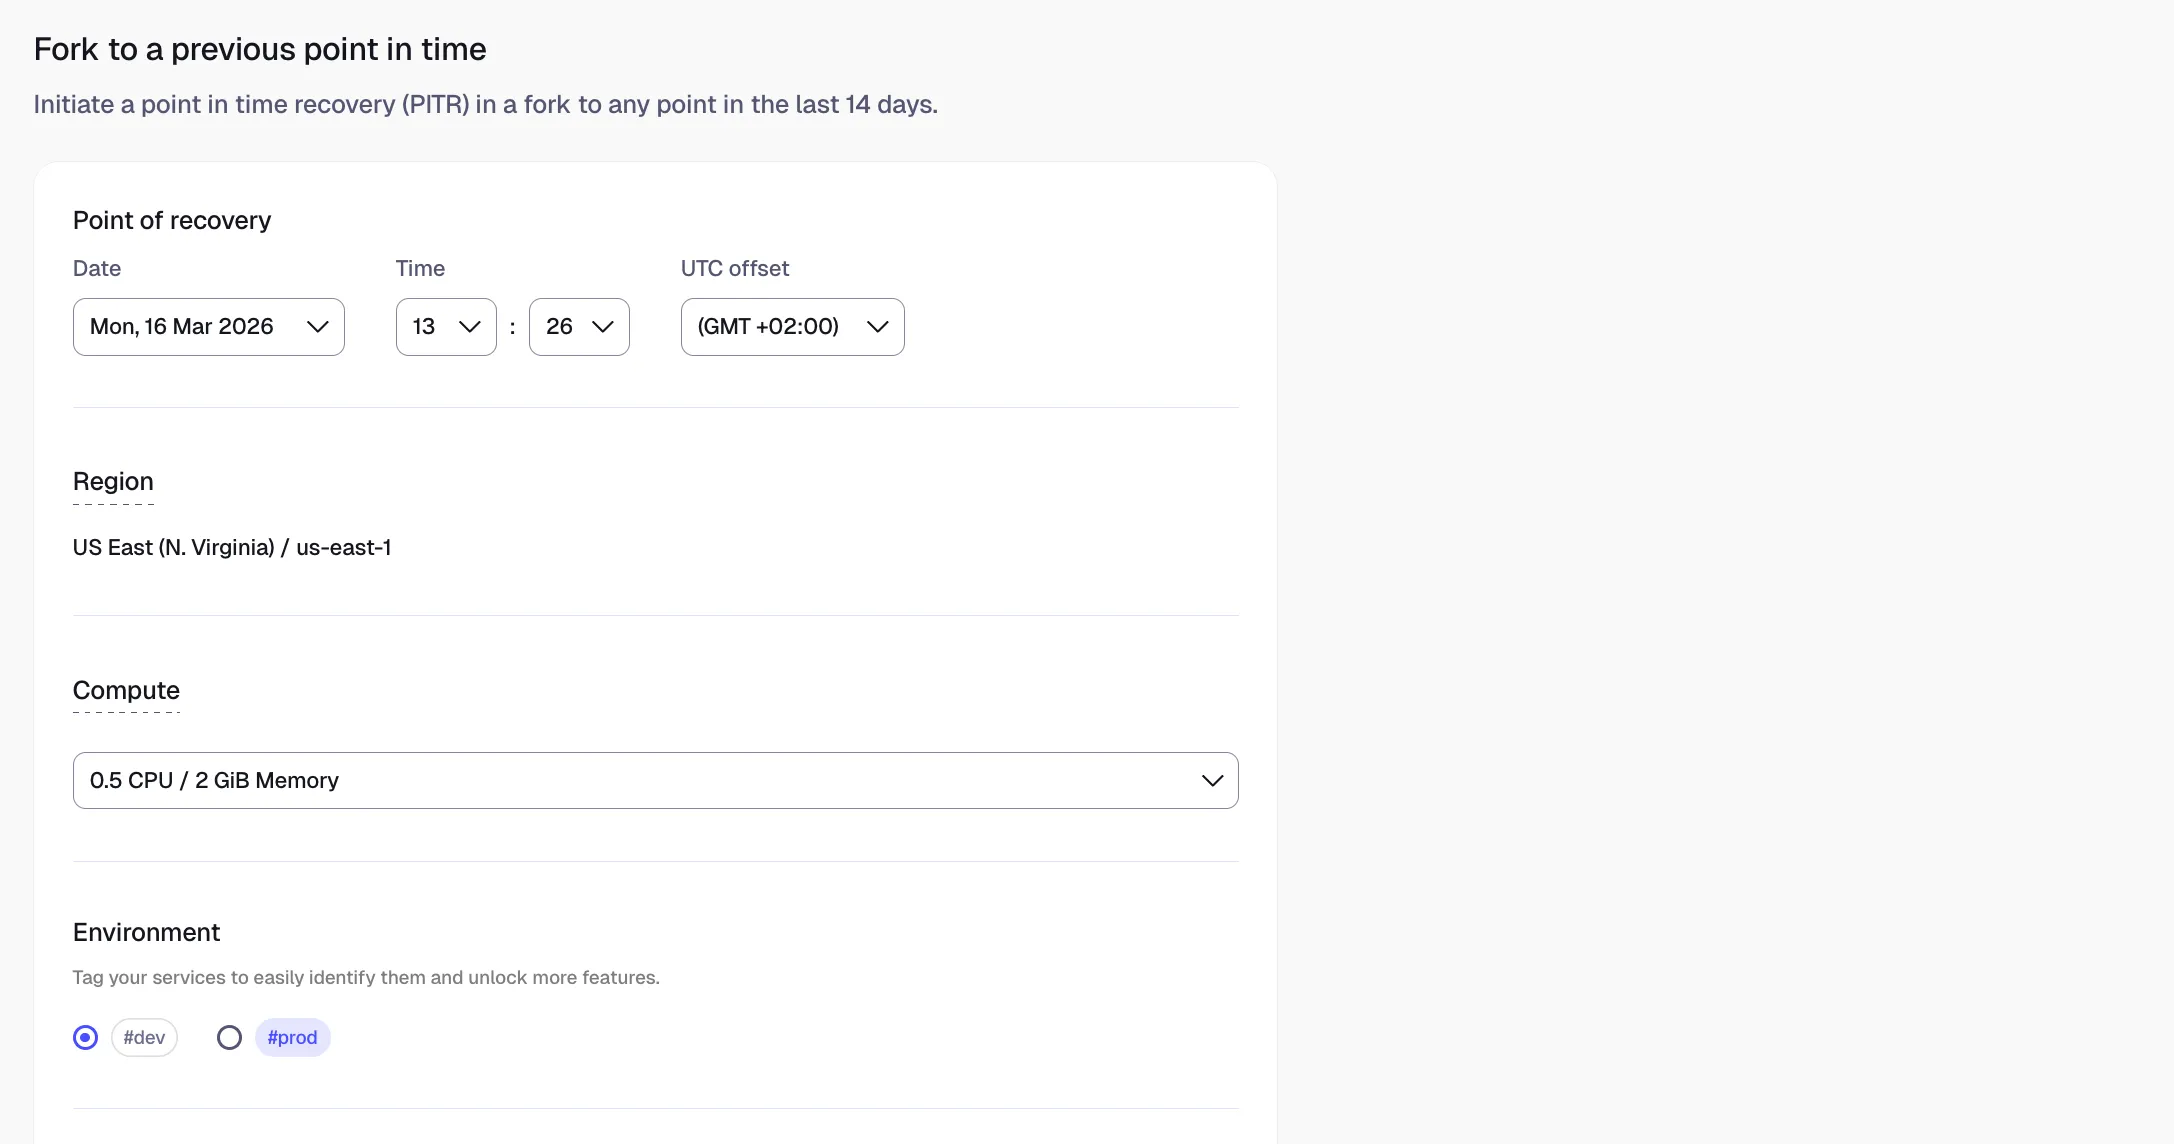
You can configure the compute resources, add an HA replica, tag your fork, and add a connection pooler. Best practice is to match the same configuration you had at the point you want to recover to.
- Confirm the recovery fork
Confirm by clicking
Create recovery fork.A fork of the service is created. The recovered service shows in
Serviceswith a label specifying which service it has been forked from. - Update the connection strings in your app
Update the connection strings in your app to use the fork.
Create a service fork
Section titled “Create a service fork”To manage development forks:
- Install Tiger CLI
Use the terminal to install the CLI:
Terminal window curl -s https://packagecloud.io/install/repositories/timescale/tiger-cli/script.deb.sh | sudo os=any dist=any bashsudo apt-get install tiger-cliTerminal window curl -s https://packagecloud.io/install/repositories/timescale/tiger-cli/script.deb.sh | sudo os=any dist=any bashsudo apt-get install tiger-cliTerminal window curl -s https://packagecloud.io/install/repositories/timescale/tiger-cli/script.rpm.sh | sudo os=rpm_any dist=rpm_any bashsudo yum install tiger-cliTerminal window curl -s https://packagecloud.io/install/repositories/timescale/tiger-cli/script.rpm.sh | sudo os=rpm_any dist=rpm_any bashsudo yum install tiger-cliTerminal window brew install --cask timescale/tap/tiger-cliTerminal window irm https://cli.tigerdata.com/install.ps1 | iexTerminal window curl -fsSL https://cli.tigerdata.com | sh - Set up API credentials
-
Log Tiger CLI into your Tiger Cloud account:
Terminal window tiger auth loginTiger CLI opens Console in your browser. Log in, then click
Authorize. You can have a maximum of 10 active client credentials. If you get an error, open credentials and delete an unused credential. -
Select a Tiger Cloud project:
Auth URL is: https://console.cloud.tigerdata.com/oauth/authorize?client_id=lotsOfURLstuffOpening browser for authentication...Select a project:> 1. Tiger Project (tgrproject)2. YourCompany (Company wide project) (cpnproject)3. YourCompany Department (dptproject)Use ↑/↓ arrows or number keys to navigate, enter to select, q to quitIf only one project is associated with your account, this step is not shown. Where possible, Tiger CLI stores your authentication information in the system keychain/credential manager. If that fails, the credentials are stored in
~/.config/tiger/credentialswith restricted file permissions (600). By default, Tiger CLI stores your configuration in~/.config/tiger/config.yaml.
-
- Test your authenticated connection to Tiger Cloud by listing services
Terminal window tiger service listThis call returns something like:
-
No services:
🏜️ No services found! Your project is looking a bit empty.🚀 Ready to get started? Create your first service with: tiger service create -
One or more services:
┌────────────┬─────────────────────┬────────┬─────────────┬──────────────┬──────────────────┐│ SERVICE ID │ NAME │ STATUS │ TYPE │ REGION │ CREATED │├────────────┼─────────────────────┼────────┼─────────────┼──────────────┼──────────────────┤│ tgrservice │ tiger-agent-service │ READY │ TIMESCALEDB │ eu-central-1 │ 2025-09-25 16:09 │└────────────┴─────────────────────┴────────┴─────────────┴──────────────┴──────────────────┘
-
- Fork the service
Terminal window tiger service fork tgrservice --now --no-wait --name bobYou must specify exactly one timing option:
--now(fork at current state),--last-snapshot(fork at last snapshot, faster), or--to-timestamp(fork at specific point in time). By default a fork matches the resources of the parent Tiger Cloud service. For paid plans, specify--cpuand/or--memoryfor dedicated resources.You see something like:
🍴 Forking service 'tgrservice' to create 'bob' at current state...✅ Fork request accepted!📋 New Service ID: <service_id>🔐 Password saved to system keyring for automatic authentication🎯 Set service '<service_id>' as default service.⏳ Service is being forked. Use 'tiger service list' to check status.┌───────────────────┬──────────────────────────────────────────────────────────────────────────────────────────────────┐│ PROPERTY │ VALUE │├───────────────────┼──────────────────────────────────────────────────────────────────────────────────────────────────┤│ Service ID │ <service_id> ││ Name │ bob ││ Status │ ││ Type │ TIMESCALEDB ││ Region │ eu-central-1 ││ CPU │ 0.5 cores (500m) ││ Memory │ 2 GB ││ Direct Endpoint │ <service-id>.<project-id>.tsdb.cloud.timescale.com:<port> ││ Created │ 2025-10-08 13:58:07 UTC ││ Connection String │ postgresql://tsdbadmin@<service-id>.<project-id>.tsdb.cloud.timescale.com:<port>/tsdb?sslmode=require │└───────────────────┴──────────────────────────────────────────────────────────────────────────────────────────────────┘ - When you are done, delete your forked service
-
Use the CLI to request service delete:
Terminal window tiger service delete <service_id> -
Validate the service delete:
Are you sure you want to delete service '<service_id>'? This operation cannot be undone.Type the service ID '<service_id>' to confirm:<service_id>You see something like:
🗑️ Delete request accepted for service '<service_id>'.✅ Service '<service_id>' has been successfully deleted.
-